I am doing a little data crunching on QCR results but in the
mean time I thought republish a buildings tactics article I did a while
back.
I find buildings to be one of the more interesting terrain
features on our battlefields. Its set of
rules can influence a game and make a given match up feel much more unique. I
find it good practice to discuss all terrain features with your opponent prior
to a game. For example, how many floors
a building has, what is the foot print if mounted on a base, etc.
Impassable. An important feature of a building is that it
is treated as impassable terrain unless you enter it to garrison. This leads to several interesting tactics. Clearly, many of these are situational. I find that by simply placing a building in the
middle, you increase the frequency of opportunities that may develop.
Flee through
building: The first is fleeing
through the building. Your troops can
now flee through a building (after taking dangerous terrain tests) while a
charger must stop an inch short. By
setting up flee angles so that you go through the building, you only have to
roll high enough to reach the building, not out run the charger, increasing the
probability that the fleer gets away.
Anchor/Roadblock: I look to the impassable nature of buildings
as a way to split up my opponent’s battle line.
A standard strategy for me is to push one flank while refusing the
other. With a building, I can use it as
a pivot point. I use it to protect the
flank of units you are pushing forward.
It will get in the way of opponents attempts to shift forces over, which
may have to go around the building. I
often deploy highly maneuverable units opposite the building. Fast Cav, chariots, monsters, warshrines,
etc. While this seems counterintuitive
since they cannot enter a building, there lack of a need to wheel allows them
to maneuver around the building quickly.
Making a unit immune
to being charged: I have seen this frequently
in tournament play. You move a model so
that it is an inch away from the house. Any
enemy unit that it is in its front arc will be unable to charge it since it cannot
make contact with the front arc, even though it could easily contact a
flank.
Clipping: There are a number that have a high damage
output on a narrow frontage, such as Chariots, monsters, warshrine, and single
characters. They will benefit from being
in contact with as few models as possible, allowing them to bring their full
damage output in play while receiving few attacks back.
In the above example, without the building, the Chariot
would be forced to move forward until its wheel would be such that it contacts
the maximum number of models. With the
building in the way, the chariot must wheel earlier, bringing fewer models in
contact. Since the Chariot only needs to
touch one model to inflict its total damage potential, this is desirable.
Forcing an opponent
to conform to you: An opponent may
place a chaff unit in front of one of your units at an inconvenient angle. A building may keep you from closing the
door, meaning that this chaff unit now conforms to you.

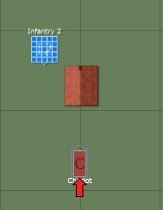
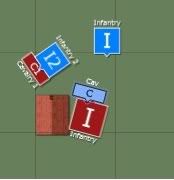
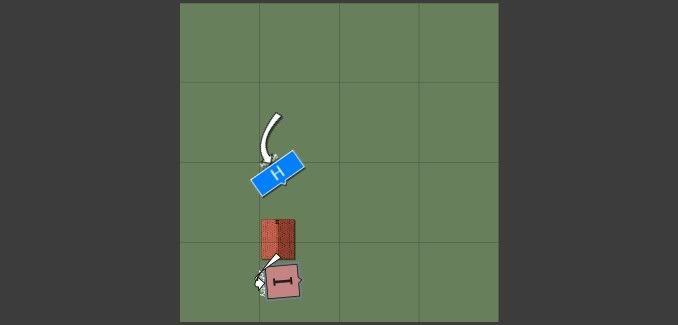
Blue is in a spot of trouble. He has a unit locked up with Chaos Knights
with a MoK Warrior unit ready to flank charge.
He also has an infantry unit almost straight ahead who likely does not
want to go toe to toe with the Warriors.
He decides to use a fast cav unit to redirect the frenzied Warriors,
exposing their flank to a charge.
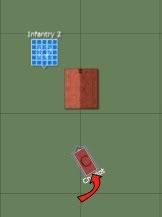
Unfortunately he has made a mis-calculation. When the blood thirsty Warriors charge, they
cannot conform to the cav due to hitting the building. They force the cav to conform to them, likely
expending themselves for no gain and allowing the Warriors to over run into the
Infantry.

Most of these tactics can be used with any impassable
terrain piece. Honestly I rarely attempt
to set any of these up but rather put my units in a position to take advantage
of them if they present themselves.
A review of moving in and out of buildings. You may not enter a building while executing
a march maneuver. However, other
maneuvers are allowed. When exiting a
building, you must have at least one model from the rear rank 1” away from the
building (faq changed from in contact) but the unit may be in whatever
formation you desire, as long as no model moved more than twice its
movement.
How far was that
Normal Move? The building rules are
clear that you may not make a March move to enter a building. This seems to limit the distance that you may
move into a building to your normal movement allowance. However, by using the swift reform move, you
can actually do better. Simply swift
reform into a conga line, with the front aimed at the building, then move
in. Just remember, according to pg XX of
the brb, the farthest a model may move when it executes a maneuver is twice its
base movement. This maneuver can be met
with a frown from your opponent, as many players view it as rather cheesy. I have never used the maneuver for this exact
reason and only bring it up so you are aware of it.
Hide and Seek: I use this to keep a unit alive that is being
pressed by a superior unit and I do not want to give up the points, while at
the same maintain my unit as a credible threat if need be. This tactic involves jumping in and out of a
house with the target unit. At times,
keeping the house in between the units, hunkering down, and/or slipping out to
threaten the rear if the enemy unit turns away.
My old WoC list had 20 man Marauder units and I was often asked how I
used them. This is one example


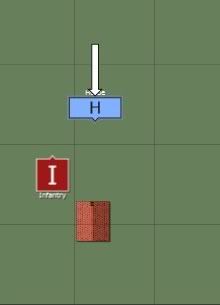
We see in the first turn and a half that I move up but stay
close to the house. I would stay within
the ability to move backwards into the house.
Otherwise you will need to fast reform to get into it. I know this is a simplistic example and horde
formations tend to be in the center, but it is not unusual to find opponents
placing units of uber death on a flank in the hopes of turning yours.
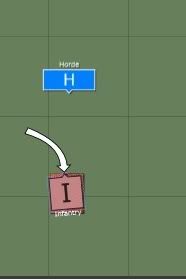
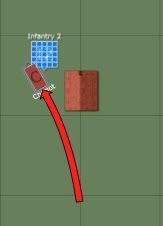
The next turn is the first decision point for the blue
player. He can attempt a long charge the
marauders in the house, move towards the house while starting an angle towards
the center, or turn towards my main battle line. Charging the marauders has a chance of
failing. A successful charge concedes
his horde advantage, subjects him to 20 ST5 attacks at I4, has my unit
automatically steadfast, likely will get away if I break (assuming I do not run
off the board), and puts him in the house if he wins (I will discuss this in a
later chapter), stuck in front of if I hold.
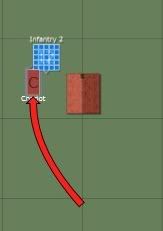
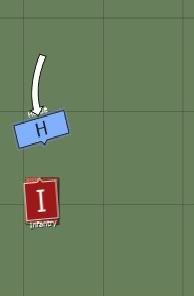
A turn towards my flank will see me pop out of the building to threaten the
flank/rear of the unit. If I have done
my job, there should be a chaff unit close by to make sure he cannot crash into
the flank of another on his turn. In
this case my opponent has chosen a bit of a middle ground, advancing, while
wheeling a bit but making sure not to expose a flank if I pop out. I simply pop out the back to threaten if he
continues to move towards the middle.
Blue could go into the building to keep pushing me back but that is ok. I have bought three turns, he has to come out
of the building before he charges (and I will likely go right back in) and on
it goes.
Well back to the data crunching. I hope to have some conclusions about how armies did against each other.
Hinge
No comments:
Post a Comment